Import
On the Tools tab, in the External data group, the Import menu includes tools for importing External Data Management (EDM) objects from XML and mapping the EDM data to COS attributes, component models, and catalog parts.
Import from file (EDM)
You can import externally defined object data from XML files. The imported data is stored as EDM objects in the COS database. Re-importing a file updates the existing EDM data by adding, updating, and removing attributes, as applicable.
Prerequisites
- The required data mappings have been defined as described in Edit settings.
Do the following:
-
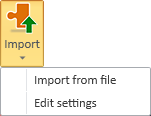
Select Tools tab > External data group > Import > Import from file.
-
In the file browser, select the .xml file from the file system, and click Open.
-
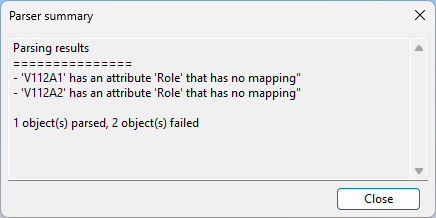
In the Parser summary dialog, review the results of parsing the import file. If there are issues, consider whether you need to fix the issues and re-import the file. Click Close to continue.

-
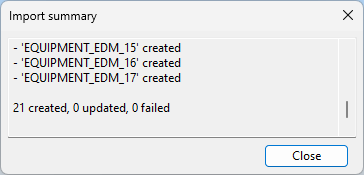
In the Import summary dialog, review the results of the import, then click Close.
The imported EDM objects are now stored in the COS database.
Import from file (EPD)
You can import diagram object data from XML files. The imported data is stored as EPD objects in the COS database. You can use the Manage integration objects tool to link imported EPD objects to model objects, just like any diagram objects received from the P&ID application.
Prerequisites
- The required data mappings have been defined as described in Edit settings.
- You have an XML file that lists diagram objects. See Using Microsoft Excel to create an XML file for diagram object import.
Do the following:
-
Select Tools tab > External data group > Import > Import from file.
-
In the file browser, select the .xml file from the file system, and click Open.
-
In the Parser summary dialog, review the results of parsing the import file. If there are issues, consider whether you need to fix the issues and re-import the file. Click Close to continue.
-
In the Browse imported objects dialog, review the results of the import. The Import action column displays whether the import creates a new object or updates an existing one. The other columns display data that could be mapped from the XML file. Then click OK to continue.

-
In the Import summary dialog, review the results of the import, then click Close.

The imported EPD objects are now stored in the COS database.
Edit settings
Before importing EDM or EPD objects from XML, define the relevant mappings as described below.
Prerequisites
-
The COS attribute's type should be "String", "Enumerated", or "Coded enumerated". In the XML file, the value of an "Enumerated" attribute is given as a text string, and the value of a "Coded enumerated" attribute is given as an integer.
Note: Also other COS attribute types can be used, but then you must ensure that the values defined in the XML file match the unit defined for the COS attribute. For example, if the COS attribute is of type "Float", the values will be imported from the XML file as they are, without any conversion.
-
The COS attributes have been assigned to the "Model Object" object type (for 3D model objects) and/or to the "External Data Management" object type (for diagram objects).
Do the following:
-
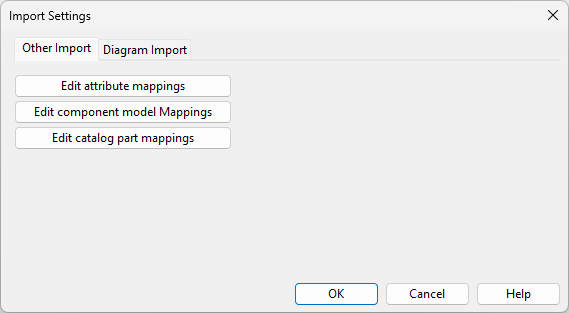
Select Tools tab > External data group > Import > Edit settings. The Import Settings dialog opens.
-
Do one of the following:
-
To create mappings for EDM import, select the Other Import tab.
-
To create mappings for EPD import, select the Diagram Import tab.
-
-
To map imported attributes to integration objects (EDM attributes to the "External Data Management" COS object type, EPD attributes to the "Externally Provided P&ID Data" COS object type) click Edit attribute mappings, and then map the required attributes as follows:
-
Click Add.
-
In the Value field, type the name of the attribute exactly as it is defined in the XML source.
-
In the Mapped value field, click Select and select the appropriate COS attribute.
-
Click OK.
-
-
To map imported attributes to component models in the CADMATIC library, click Edit component model mappings, and then map the required component models as follows:
-
Click Add.
-
In the Value field, type the name of the attribute exactly as it is defined in the XML source.
-
In the Mapped value field, click Select and select the appropriate component model.
-
Click OK.
-
-
To map imported attributes to catalog parts in the CADMATIC library, click Edit catalog part mappings, and then map the required catalog parts as follows:
-
Click Add.
-
In the Value field, type the name of the attribute exactly as it is defined in the XML source.
-
In the Mapped value field, click Select and select the appropriate catalog part.
-
Click OK.
-
-
Click OK.